Lifting Heavy Objects

Lifting at home and at work

Know the risk points and your limits. Awkward shapes and sizes, lifting overhead, and heavy weights all come with higher incidence of injury. Not sure on the weight? Try pushing it on the ground first to gauge its weight. It’s better to ask for help, or use a dolly, when it’s beyond something you can safely lift.

Is it packed right?

A balanced load makes for safer lifting. When things shift, it’s easier to lose your grip and the box fall.

Take your time

Rushing doesn’t allow enough time to evaluate the lift and use good form. Slow, smooth lifting protects muscles from strain.

Get close

Reaching and lifting are not a good combination. Keep your center of gravity close to the object you are lifting. As you carry the object, keep it as close to the center of your body as possible.

Posture is everything

Feet shoulder width apart, bend at the knees to straddle the load, flex your midsection, and lift with your legs.

Where to cheat with posture

If you are lifting a light object, you don’t need the same lifting technique as with mid-weight and heavy objects. Hold on to something sturdy for support, slightly bend one knee, lean over and allow your other leg to rise slightly.

Save the twist for the dance floor

Lifting and twisting often result in injury and increased strain on the back. Your solution: point your toes and pivot your body as a unit, rather than turning at the waist.

A back belt won’t save you

It hasn’t been proven that back belts can protect you from injury.

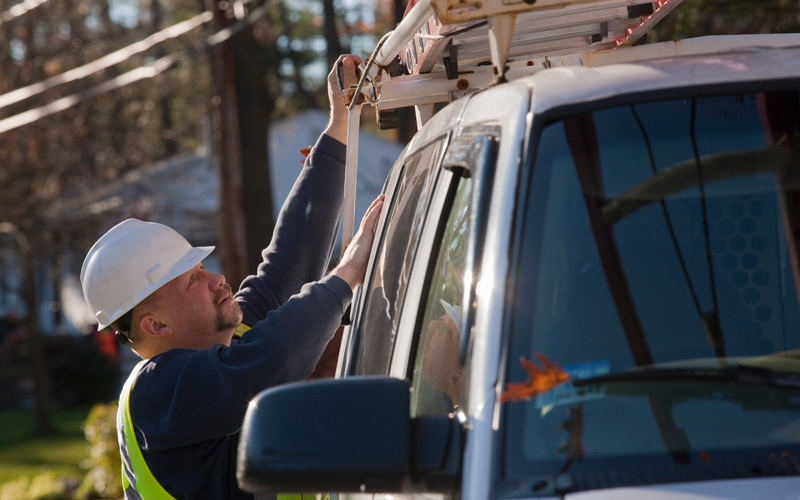
When you have to lift overhead

Get close to where the box is going, take a wide stance, and flex your midsection as you lift upwards. Avoid straightening your arms. If you can’t get the box to where it needs to go while keeping your arms bent, then it’s time to get a sturdy step ladder.

Hip and Knee Risk Assessment

Eventually we all start to notice the wear and tear on our joints. Whether it’s pain during a chilly morning jog, a twinge after sitting in your favorite recliner, or joints complaining from simply walking the aisles of the grocery store. We know each step of aging brings with its own cocktail of physical discomforts, but when joint pain stands in the way of what we want to do, it’s time for a change.

Perhaps you’ve started to wonder about the condition of your own knee or hip. Is it time to see someone? Well it is exactly those thoughts that brought us to offer this Hip and Knee Risk Assessment.

It is completely free, and walks through a series of questions based on internationally accepted research to give you an evaluation of your joint. While nothing can replace a doctor doing a physical exam, this is a great place for you to start to learn more about your joint and what your next steps might be.

We welcome you to take the assessment and share it with friends, family, coworkers, that neighbor over the fence, or even shout it out on Facebook.

6 Ergonomics Tips

Don’t let your mouse become a trap for injury

Hold the mouse loosely with your fingers. Pivot at the elbow rather than the wrist, and use your arm and shoulder to move the mouse. Avoid lifting your fingers off the mouse as this can create strain on your forearm muscles. If you use your mouse more than 50% of the time at work, you may want to consider an ergonomic mouse.

Set up your work surface ergonomically

Your monitor should be about an arm’s length away with the top of the monitor at eye level. Your keyboard and mouse should be on the same surface, and keep commonly used items within reach. Wrist rests are recommended for keyboards, but not for the mouse. The biggest surprise for many: Put your phone on the opposite side of the mouse.

Body posture matters

Starting from the top, your shoulders should be down and relaxed. Keep forearms parallel to the ground, with wrists straight and elbows close to your trunk. The goal is to avoid reaching for the mouse. Moving to the lower body, your knees should be at 90 degrees with your thighs parallel to the ground. Place your feet flat on the floor or use a footrest to get to that magic 90 degree angle for knees and hips.

Check that chair

Adjust the lumbar support, if your chair has that feature, to match the natural curve of your lower back. When sitting in your chair, you should be able to fit 2-3 fingers between the back of your kneecaps and the seat edge. Armrests should be adjusted so your shoulders can be down and relaxed, rather than pushed upwards.

Type like a pianist

Float your wrists like you are playing the piano. If you are more comfortable planting your wrists against a surface, we recommend getting a gel-like keyboard pad. When you are going to be typing for a period of time, center your body on the space bar and avoid contact with a sharp desk edge.

Stretch it out

Take frequent breaks to stretch – a good guideline would be stretching every 20-30 minutes. Pump your shoulders, wrists and hands to bring relief to muscles that have been statically holding you in position while you are at your desk.

Related Information:

Understanding Degenerative Disc Disease

Degenerative disc disease and related conditions are some of the most common causes of low back and neck pain. Understanding these diseases is the first step toward effective treatment.
The spine is an interdependent system of 34 vertebrae, more than 100 joints, 120 muscles, and 23 discs. Our discs are designed to provide cushioning between the vertebrae, and provide us with flexibility and range of motion. Unlike muscles, our discs have a minimal blood supply. When structures in our body are injured, blood supplies the healing nutrients and oxygen needed for repair and healing. This means that once a spinal disc is injured, it cannot repair itself the way our muscles can.

Affected discs may be located in the neck (cervical spine), middle of the spine (thoracic spine), or in the lower back (lumbar spine). Once we suffer an injury to a disc, it degenerates in three general stages that may occur over a period of 20 to 30 years:

  • Dysfunction caused by the pain of the injury.
  • A long phase of relative instability at the vertebral segment cushioned by the injured disc, causing intermittent back pain.
  • Re-stabilization of the injured disc accompanied by a decrease in episodes of back pain.

Demographic studies show that degenerative disc disease causes less back pain for elderly adults than it does for adults between the ages of 30 and 50. However, disc degeneration can lead to the onset of other spinal conditions that do cause back pain for elderly adults. These conditions include:

  • Spinal stenosis. This form of spinal degeneration can occur in the cervical or lumbar spine. It causes the spinal nerve roots to be compressed, and can cause tingling, weakness, or numbness—the symptoms of sciatica.
  • Osteoarthritis. This disease causes a breakdown of the cartilage between the facet joints located in the back of the spine. The facet joints become inflamed, and back motion and flexibility decrease. Over time, bone spurs typically form on the facet joints in response to joint instability.
  • Spondylolisthesis. When the facet joints degenerate significantly, they can become mechanically ineffective, causing one vertebra to slip out of place, causing back pain and/or leg pain.

Depending on the diagnosis, Minnesota Occupational health physicians may refer patients to a specialist at Summit Orthopedics. Summit’s back specialists diagnose spinal problems and design custom treatment plans built on a conservative, non-surgical approach. Most patients find relief through treatments including guided injections, specialized physical therapy, biofeedback, exercise, activity modification, and medication. When conservative care does not relieve symptoms, surgical options are discussed. Patients and their care team will determine the best course of action.

Tips to Protect Your Wrists

Imagine what it would be like to perform your daily tasks without bending your wrists. Suddenly, everything from brushing your teeth to checking email takes on a whole new level of complexity. We spend almost all day using our wrists and hands, so it should come as no surprise that complaints about wrist pain are among the most common concerns physicians hear. Wrist complaints are not limited to office workers; wrist issues can affect the inactive as well as the active, and the moderately active people in between.

Wrist pain can be caused by a number of problems. Some arise suddenly, and others progress slowly over time. Repetitive stress injury is the result of using your wrist to do the same action over and over again, and is often seen in carpenters, musicians, postal workers, and athletes. Carpal tunnel syndrome, affecting the passageways conducting nerves and tendons through your wrists, is a problem faced by many professionals who work at a computer. Your wrist can also be injured in a fall or other trauma.

Related Information:

  • Learn about our ergonomist solutions.

Prevention is always the best approach. We have a couple of suggestions to help you prevent wrist injury:

  • Give attention to ergonomics. If your desk and keyboard are positioned for the comfort of your shoulders, elbows, wrists, and hands, you’ll be less likely to develop a problem. An ergonomic keyboard and cushioned wrist supports can help.
  • Take regular breaks from your work to stretch your shoulders, neck, wrists and fingers.
  • Do wrist exercises twice a day.
  • Wear wrist guards if you rollerblade, snowboard or play football.
  • Build your bone strength. After 50, women need at least 1,200 milligrams of calcium, and other adults need about 1,000 milligrams. Strong bones will help prevent wrist fractures.
  • Safeguard your habits and your home to prevent falls. Falling onto an outstretched hand is the main cause of most trauma-related wrist injuries. You are less likely to lose your balance and fall if you are wearing sensible shoes, living in well-lit spaces, and have grab bars in the bathroom and handrails on the stairs.

If the unexpected happens and you do injure your wrist, it is important to seek a medical evaluation. Sometimes, a seemingly mild injury can mask a torn ligament or fracture. Only prompt diagnosis and treatment will prevent possible stiffness, pain, or unnecessary surgery later. By taking preventative measures now, and consulting with your physician if there is an injury, you are doing your part to protect your wrists and keep them healthy.

The Link Between Weight and Orthopedic Risks

Maintaining your weight through a healthy diet and sensible exercise program is one of the most valuable preventative steps you can take to reduce your risk of health problems and preserve your quality of life. Excess weight and obesity have been linked to health issues from high blood pressure to type 2 diabetes, heart disease, and stroke. Because extra weight strains almost every organ in the body, it is no surprise that it can affect arthritic joints as well.

The November 2014 issue of the Journal of the American Academy of Orthopaedic Surgeons includes a study that discusses the ramifications of obesity on orthopedic health:

  • Musculoskeletal and chronic pain. Adolescents with obesity report more musculoskeletal and chronic regional pain than their normal-weight peers. For the elderly, obesity nearly doubles the risk of chronic pain in soft tissues and joints.
  • Increased risk of osteoarthritis. Osteoarthritis is a progressive “wear and tear” joint disease. Because each pound of body weight puts an additional four pounds of pressure on knees, excess weight increases the risk of damaging wear and tear on the joint. Losing as little as ten percent of your total body weight can reduce joint pain and decrease risk of developing arthritis in joints that are not already affected.
  • Higher incidence of musculoskeletal injury. Not only does extra weight increase joint wear and tear—it also makes injury more likely. People who are overweight are 15 percent more likely to sustain musculoskeletal injury, and people who are obese are 48 percent more likely to suffer orthopedic injuries. The odds of an injury are also higher for overweight and obese children.
  • Slower surgical recovery and higher risk of surgical complications. Although obese patients don’t face contra-indications for elective orthopedic surgery, they do risk possible complications that may compromise their surgical outcomes.

The simplest way to achieve a healthy weight is to eat less and move more. Taking these preventative steps now will help you optimize your quality of life later.

Ten Days To Improved Range Of Motion

The research is clear: Exercise is one of the most important things all of us can do to preserve our health. For patients with arthritis, exercise is a treatment as well as a preventative measure. A regime of appropriate stretches can help to improve range of motion and ease the stiffness and pain of arthritic joints.

Cold, snowy weather may restrict some exercise habits, but these stretches can easily be done at home. If you work through them slowly and stay within your own abilities, you can start to see joint mobility improvement before two weeks have gone by.

  • Neck exercises. We have two easy exercises to loosen neck muscles and relieve stress. Start in a sitting or standing position, and then roll your head around in large circles. Then, bend your head so that your left ear moves toward your left shoulder. When you’ve bent your head as far as you comfortably can, hold for 5 seconds and release. Repeat on your right.
  • Loosen your shoulders. Sit or stand with your head erect, then shrug your shoulders up to 20 times. Afterwards, reach up with your arms and stretch as high as you comfortably can.
  • Limber up hands and wrists. As you sit at a table or relax on the couch, roll your hands around in circles to keep wrist joints loose. To address finger joints, make a fist and hold for a two-second count, and then stretch your fingers out as straight and wide as you can without straining for a four-second count. Repeat as often as you like, or at several different times during the day.
  • Gentle bends for your back. Take your time and concentrate on slow, fluid movements for these exercises. Standing with feet at shoulder length apart, try slow side bends on one side, then the other. Then, stand about two feet from a wall, facing away from it. Turning first to your left and then to your right, attempt to touch the wall with your hands. Begin by reaching for the wall at shoulder height. As you become more limber, attempt to touch the wall closer to waist level.
  • Stretch your hips. Sit in a chair with your back straight. Hold the seat of the chair with your hands to steady yourself, then straighten and lift first one leg, then the other. The higher you can raise your leg, the stronger the hip stretch will be. Try to repeat this stretch at least five times with each leg.
  • Care for your knees. Squats are a great way to strengthen knees, but if you need a simpler stretch to start, we have one for you. Sit in a chair, and bend one knee at a time, bringing it up and as close to your body as you comfortably can with your arms.
  • Ankle stretch. While seated, rotate your ankles in circles to coax away aches. Also try rocking your feet back and forth, first lifting your toes, and then rolling your foot forward so that your heels rise from the floor.

These exercises are designed to coax movement back into major joints, including your neck, back, hips, knees, and shoulders. When you feel ready, add walking to your routine to increase your benefits. Although these stretches are intended to improve joint motion within ten days, it’s important to begin within limits that are comfortable for you, and not to push yourself beyond your limits. If you have any concerns, consult your doctor before you begin.

Simple Habits for Shoulder Health

Quite often, you probably reach for an object on a high shelf, hold up a hair dryer at the perfect angle, scoop a toddler into the air, or swing a golf club without giving a thought to the shoulders that make these motions possible. Flexible shoulder joints contribute to your overall body strength and decrease the load that your bones, ligaments and joints have to bear.

The shoulder is a ball-and-socket joint. The ball-like head of your humerus (long bone of your upper arm) is twice the size of the shallow shoulder socket into which it fits, making the joint mobile, but unstable. Its movement and stability relies on the four muscles that make up your rotator cuff. Rotator cuff muscles originate on your shoulder blade and insert, or connect, as a tendon on the humerus in your upper arm. Ligaments in your shoulder and the rotator cuff muscles provide shoulder stability by holding the ball portion of the joint in the deepest, widest area of the socket.

Some repetitive motions increase rotator cuff stress and may lead to injury. Actions that make your shoulders more prone to injury include the overhead-throwing motions found in sports including baseball, football, tennis, volleyball, and competitive swimming, and in professions including construction, hair styling, and painting.

There are some simple steps you can take to avoid placing extra stress on your shoulders:

  • Pay attention to your posture. During sleep, lay either on your back or side.
  • When you sit, keep your head over your shoulders and keep your shoulders back.
  • Don’t carry a backpack or purse over just one shoulder.
  • Avoid working with your arms above shoulder level for very long. When possible, use a foot stool or ladder to lessen the strain on your shoulders.
  • Lift and carry objects close to your body. Try not to lift heavy loads with outstretched arms.
  • Take regular breaks from any activity you must repeat over and over again.
  • Keep your thumb up when you reach for something with your arm.

In addition to good habits, exercise to strengthen and stretch the muscles and tendons of your shoulder joint benefits you two ways. Conditioned muscles help reduce shoulder injury and improve shoulder performance.

Exercises to stretch your shoulder include:

  • Stretching the back of your shoulder
  • Hand-up-your-back stretch
  • Wall stretches

Exercises to strengthen your shoulder include:

  • Internal and external rotation exercises
  • Wall push-ups
  • Arm reaches

With a little attention to habits and exercise, your shoulders will thank you.

Don’t Let Your Computer Hurt Your Posture

Our digital age offers a wealth of opportunities to work in new ways in a global marketplace, but the technology that is great for business isn’t necessarily good for our posture. Days, weeks, and months spent slouched in front of a computer can strain our backs, necks, and wrists. Over time, the damage of poor posture adds up, and can eventually lead to strain or injury.

Minnesota Occupational Health (MOH) ergonomist Sue Unger has some suggestions to help us maintain good posture as we work at our computer, and prevent posture-based injuries in the future.

“There’s not a single solution for everyone,” Sue explains. “Age and other factors make each of us structurally unique. However, there are some general guidelines that everyone can follow to maintain good posture in front of a computer.”

  • Avoid slouching as you work by holding your spine upright and maintaining activation of your deep core muscles through your abdomen.
  • When you are seated, have your knees bent to approximately 90 degrees.
  • Be aware of your shoulders. Don’t elevate your shoulders and let them creep up toward your ears, and don’t let your shoulder blades roll forward.
  • Keep your head from coming forward into a “turtle head” position. You may not have the endurance to keep an absolutely straight line from spine through neck and head all day, but regularly check your posture and correct it so that you are sitting in more of a straight line.
  • Bend and hold your arms at around a 90-degree angle as you type.
  • Elevate your site line to your computer screen. The distance from eyes to screen should be comfortable (so you aren’t tempted to push your head forward) and you shouldn’t feel that you are straining to look up or down to see the screen. Your computer should be positioned at or slightly below eye level.

The chair you sit in as you work matters, but that doesn’t mean that sitting on a balance ball is your best bet. “A ball can help if used properly,” says Sue, “but just because you are sitting on a ball doesn’t mean you have excellent posture. If a ball helps you to activate the abdominals and the deepest layer of your core throughout the day, that can certainly be helpful. I teach people to be even more active in the process of posture.”

Finally, Sue recommends frequent breaks from your desk. Every 30 to 45 minutes, get up, move, stretch, and interrupt your static posture. “I treat a lot of people with injured or healing knees,” says Sue. “Sitting for a long period of time is not helpful for these people. When you feel like you are getting stiff or achy, it means you should change position. Do some stretches, push your shoulders back, get in a few small squats and knee bends. These are preventive measures that healthy people can take to stay strong and limber.

Be Smart About Using Your Smart Device

Texting and consulting our smartphones has become a way of life. Wherever we go, we see people walking along the street bent over their phone, or seated at coffee shops and cafes, phone in hand, busily texting and checking email. The convenience of instant connection via phone may be a boon to communication, but it is not necessarily a benefit to our spine’s health. The sight of people texting with their heads hunched forward and their shoulders drooping prompted a spinal and orthopedic surgeon in New York to investigate the impact of “texting posture” on our body. What he discovered may surprise you.

When we hold our head up in an erect position, we are placing about 10 to 12 pounds of pressure on our neck. However, as we tilt our head forward in the act of texting, the amount of pressure on our cervical spine increases dramatically. Tilting our head forward by 60 degrees—which is not an unusual texting position—can put as much as 60 pounds of pressure on our neck. Hunched texting postures are causing neck pain for some patients. Over time, these postures may lead to early wear and tear, degeneration of the cervical spine, and possibly surgery.

“Technology is part of our life,” says Dr. Nick Wills, a back, neck and spine specialist at Summit Orthopedics, and a member of the Minnesota Occupational Health Preferred Provider Network. “Patients shouldn’t see this study as discouraging the use of smart phones. But it is important to be aware of your posture as you use your smartphone to respond to a text, get directions, or locate a nearby lunch spot.”

If you are an avid smart phone user, consider doing the following exercises once or twice a day to improve your posture and develop better physical habits while you use your phone:

  • Remember that your eyes have a range of motion. Practice looking down at your smartphone without tilting your entire head down.
  • Keep your neck joints limber. Take a break during your day to move your head from side to side several times and touch your ear to your shoulder on both sides.
  • A little resistance will strengthen neck ligaments and muscles. Place your hands on your forehead to provide resistance as you push your head forward, then put your hands on the back of your head and try to push your head back.
  • Stretch your arms and torso. Extend your arms to your sides as shoulder height, and push your chest forward. For a bit of extra resistance, perform this stretch in a doorway. This stretch helps to strengthen the muscles your body depends on for good posture.

With awareness of your head’s position as you use your smart phone, and a few minutes of dedicated time every day to improve your posture, you can reap the benefits of technology without paying a price in neck pain over time.